Adding Products This article will provide step by step instructions to manually add a product to your store, including description of every file. Shruthi Gautham
This article will provide step by step instructions to manually add a product to your store, including description of every file
To add products:
1. Login to your Workspace
2. Click on Products from the left menu.
3. Click "Add Product".
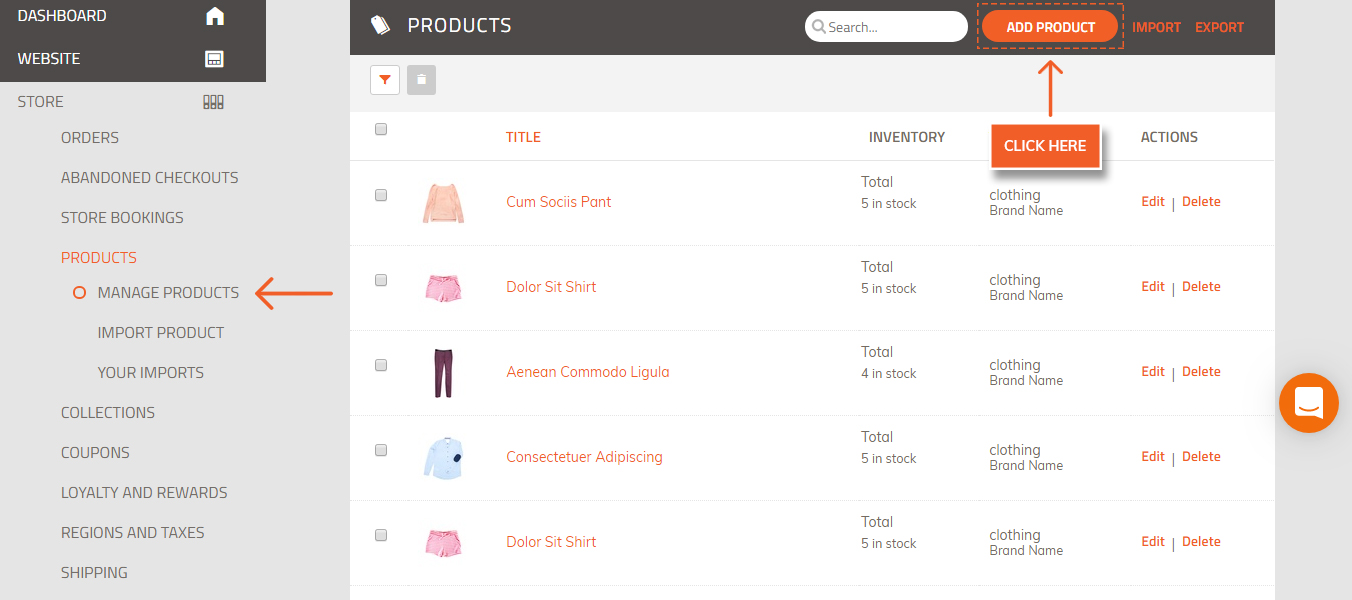
4. Enter product name and descriptions:
NOTE: The required fields are indicated with an asterisk *
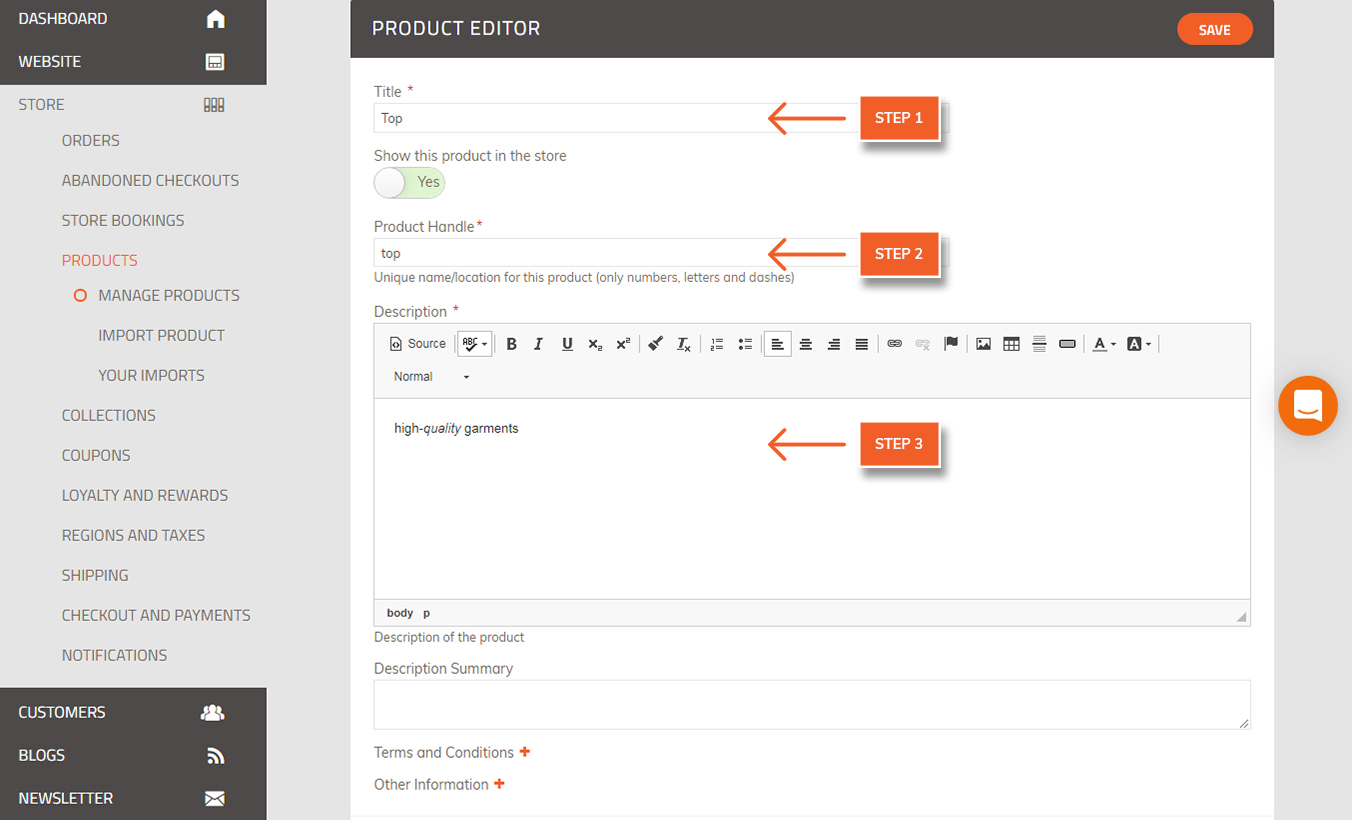
Title*: This is the name of the product as it will appear in your store front.
Product Handle*: The name you enter will create the URL for this product page. A product handle will be automatically generated as you type the title. You can modify this or leave it as is. No spaces or special characters are allowed.
Description*: Your customers will see this description on the product page. The WYSIWYG (What You See Is What You Get) text box works like a word processor; you can customize the formatting and add links.
Description Summary. This is an optional field for additional product description.
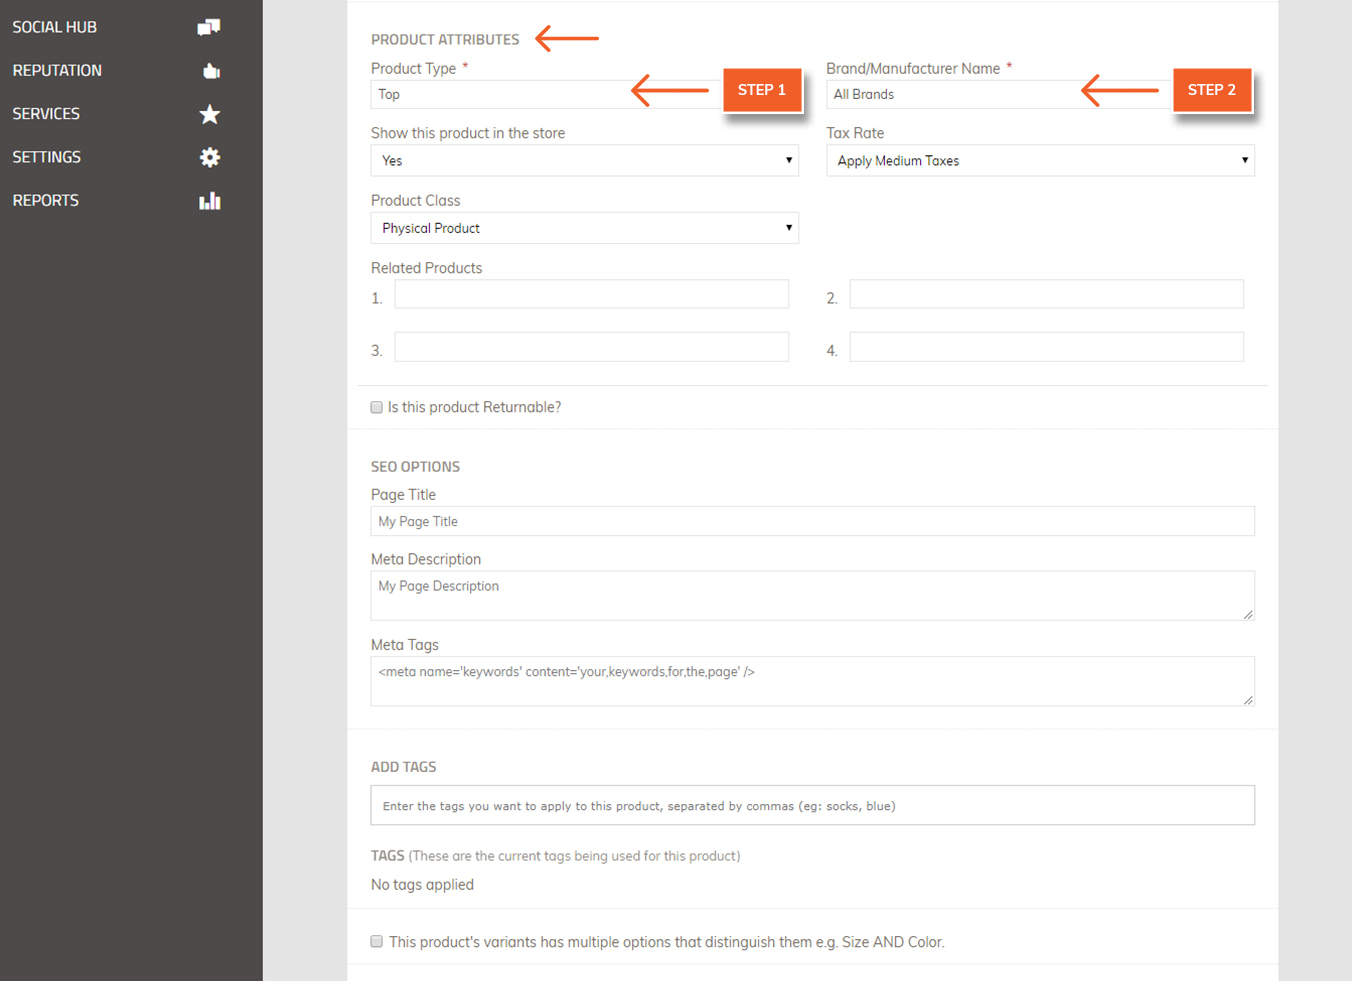
5. Enter Product Attributes: (items with a red asterisk are required)
Product Type*: this is a way to categorise your product, such as "sunglasses" or "accessories." This will allow for one way in which customers can search for your products.
Brand/Manufacturer Name*: here you enter the brand name of the product. This will allow for another way in which customers can search for your products.
Show this Product in the Store: choose yes or no, to display the product in your website for your customers. The default is "yes". Select "No" if you do not want the product to appear in your store. The product will remain in your website's inventory, and you can select "Yes" to show the product at any later time.
Tax Rate: choose whether or not to apply taxes when calculating the final cost to your customers. Read more about taxes here.
Related Products: if you choose to add related products, you can customise your website to display related products to customers as they view a product. This is a great way to cross-sell and promote additional products. Enter the product handle of the related products here. A link will appear on this product's page, linking to the related products.
Checkbox for variants: if your product has options for two or more types of variants, such as size AND color, then check this checkbox. If your product has only one type of variant (ie size) or no variants, then leave this unchecked. You will add details of this product in the Edit Variations fields described below. If you DO check this box, you will add product details for each variant individually.

6. Product Tags
You can tag your products with terms that can be used in a variety of ways, from discount coupons to creating collections of products.
Under Product Attributes, you will find the "Product Tags" section. Here you can type in appropriate tags for your products, or choose from pre-existing tags taken from your product catalog.

7. Add/Edit Variation
Here you will enter the details for a specific variation. For example, if your product is sunglasses which come in different colours, you will want to enter all the available colours for your sunglasses.
Let’s say you have 3 colours - black, brown, and red. Each colour will be a variation, so you will need 3 variations. In this example, you could enter your colour “Black” sunglasses as your first variation.
Add variation fields:
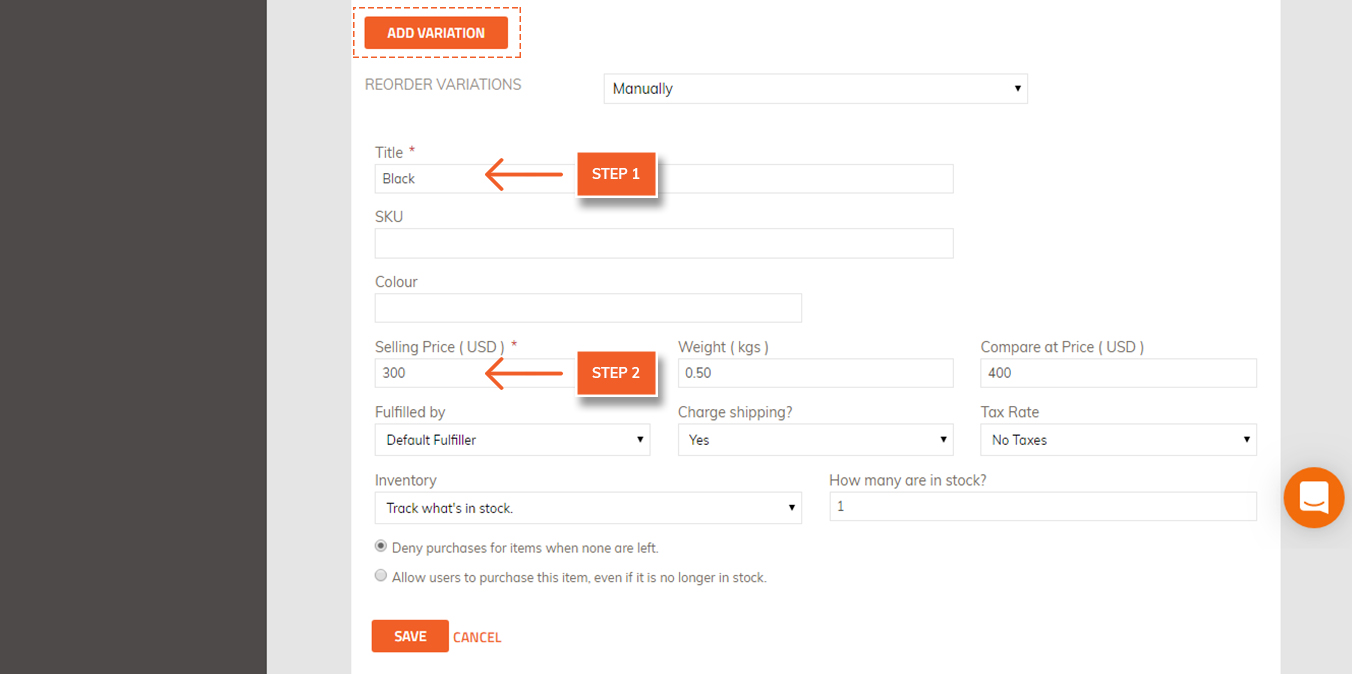
Title*: this is a required field. The title should be unique for each variation. Enter a descriptive title for the variation such as “Small”.
SKU: This field is optional, but SKU numbers are a good way to keep track of inventory, especially when you have variations. A SKU is a unique ID for each product and its variation. You can use a combination of numbers and letters to create a unique SKU for each product and its variations.
Selling Price*: this field is required, you must enter a price. Your currency will appear below the box. You can enter the same price for every Variation, or enter different prices for various options.
Weight: Enter a weight for each variation to allow for accurate shipping calculation.
Compare at Price: You can use this price setting to show how your price beats the competitors. Or you can use it to show discounted products. Think of it as a bragging feature. This number should be higher than your selling price.
[Example of how "Compare at price" would display on a website]
8. Shipping and Inventory:
For each variation, complete these fields:
Fulfilled by: The default for this field is “Me”, which means that the administrator will fulfil the order.
Charge Shipping?: If you select “Yes”, shipping will be calculated in the price. For digital products, choose “no”.
Inventory: your website can track inventory for your product. Each time a customer orders a product, your website would recalculate the number in stock for this product variation.
If you don’t want to track inventory for this product variation, keep the default “Don’t track what’s in stock”.
If you DO want to track inventory for this product variation, select “Track what’s in stock”. A field will appear to enter “How many are in stock?” Enter the quantity.Choose from the radio buttons:“Deny purchases for items when none are left” – your customers will NOT be able to order an item which is out of stock“Allow users to purchase this item, even if it is no longer in stock” – your customers WILL be able to order an item which is out of stock.

9. Click “Save Changes”. You will get a pop-up window saying “Success: [Title] saved successfully”. Click OK.
10. After you save, you will see the variation you entered, with an option to “Add Variation”. Enter more variations, as needed. In the example of the sunglasses product, you will need to add 2 more variations, for colours brown and red.
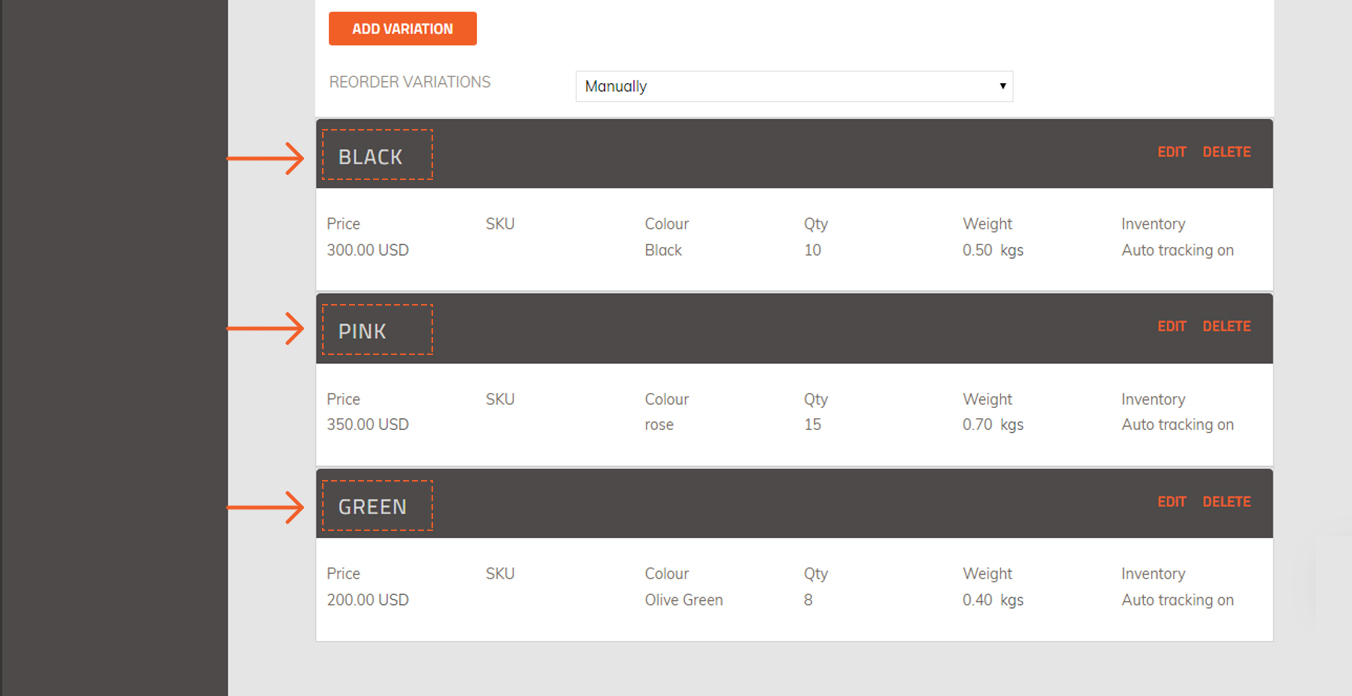
11. Continue adding variations until all of your variations have been entered.
Adding Product Images
You will want to add an image for all of your products, to show your customers what you are selling.
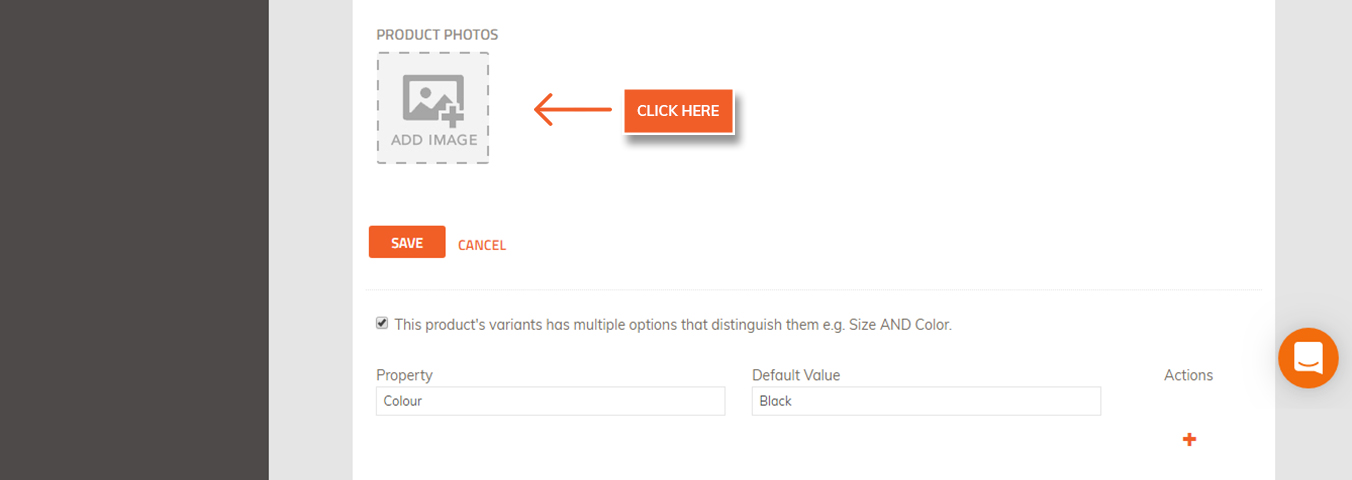
1. First, create a product. To add an image for a product, first you must create a product. After you have created your first product variation and click “Save”, you will now see a place at the bottom of the page to upload an image.
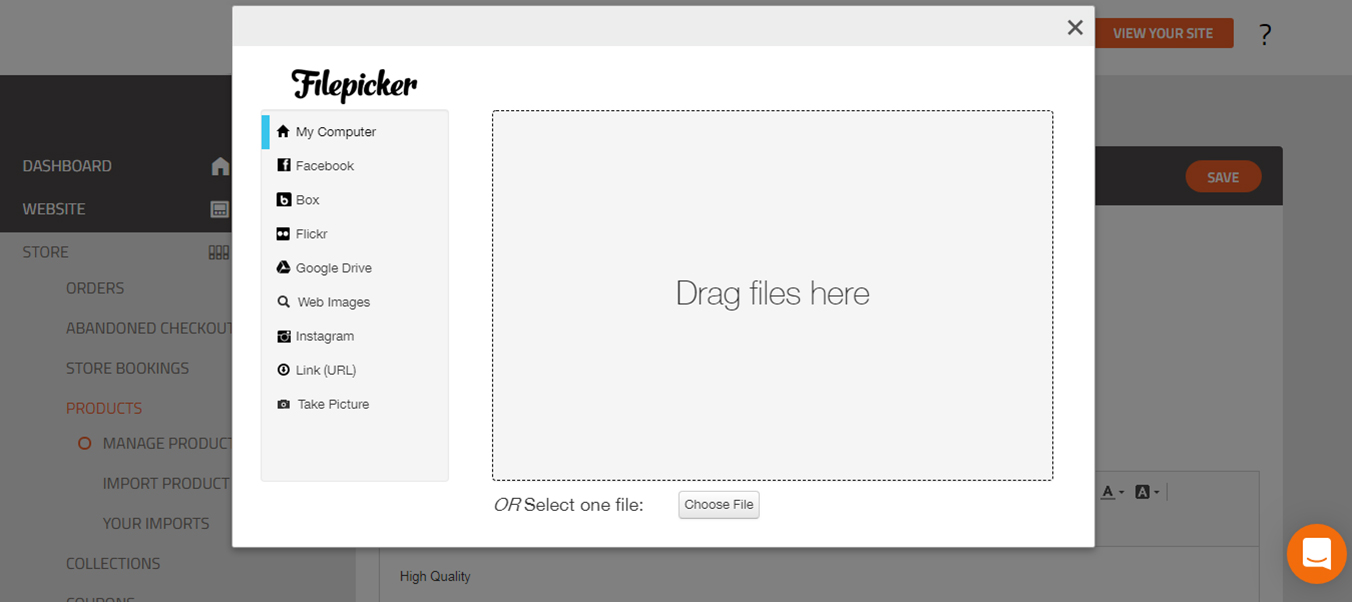
2. Click Add Image to upload your image. You can select an image from your computer or from a selection of online sites such as Facebook, Dropbox and more. To upload a file from your computer, select "My Computer" on the left, then click “Choose File” to locate the image on your computer.
Click Upload
Now you should see your image uploaded here
Our recommendations for your product image are the following:
the image size should be square, we recommend 1000 x 1000 pixels in size
the file size should be 1 MB or less
file type .jpg, .jpeg, or .png
the file name should have no special characters, including no spaces. If your file name has special characters or spaces, the file will NOT upload.
3. Add more images as desired.
You can add multiple images. After you've uploaded your first image, the image will appear under "Product Photos" and you will have the option to add more images.4

Deleting or Hiding Products
If you wish to remove a product from your store, you may either delete it or hide it. Deleting a product is permanent, you will not be able to add it back again later. Alternatively, hiding a product would only remove it from the store, but keep it in your database so that you can add it at a later time.
To Delete a Product:
1. Login to your Workspace
2. Click on Products from the left menu.
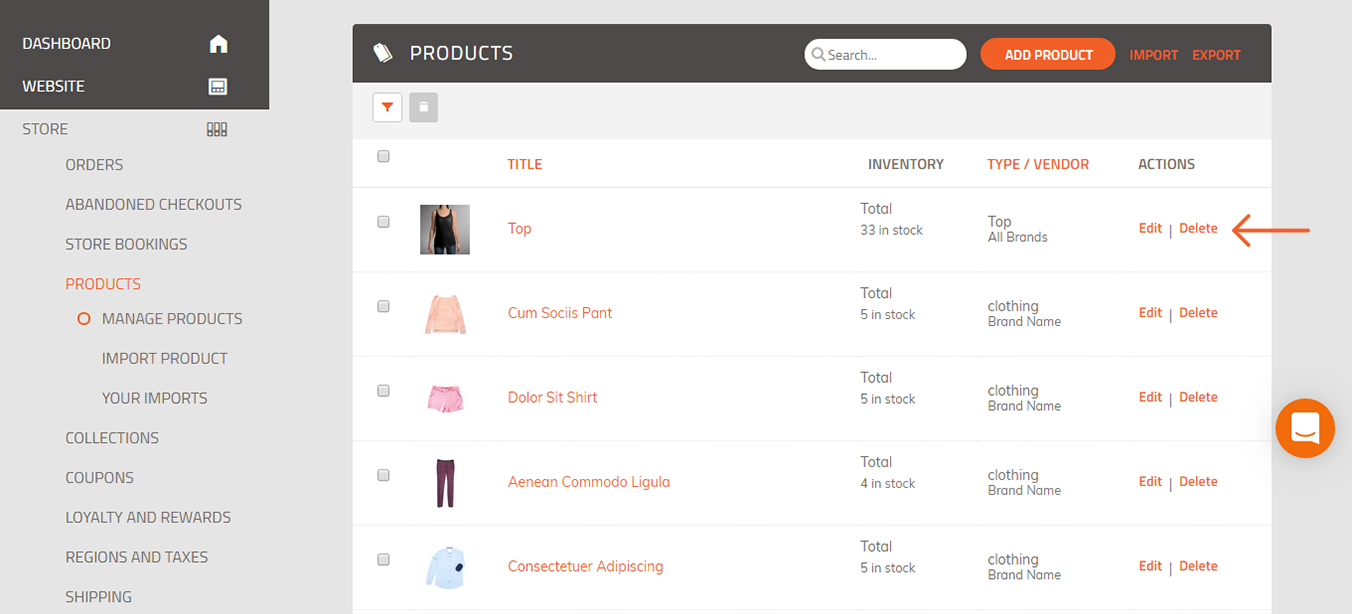
3. You will see your list of products. Click the trash bin icon next to the product you wish to delete.
4. A pop-up window will appear saying “Are you sure you wish to delete this product? Click “OK”.
5. You will get a confirmation “Product deleted successfully.”
NOTE: Deleting a product means you delete it PERMANENTLY and you would have to add that product again if you want it to be in the store.
To Hide a Product:
If you do not want a product to display in your store, but you don’t want to delete it permanently, you should hide the product instead.
1. Login to your Workspace
2. Click on Products from the left menu.
3. You will see your list of products. Click “Edit” next to the product you wish to hide.
4. Under “Product Attributes”, find Show this product in the store. Change from “Yes” to “No”.

5. Click Save. Now your product will not appear in your store.
Did this answer your question?