How to create a Newsletter? Browse through the Step by Step guide provided by Webware.io Team on how to create a Newsletter for your Webware website. Shruthi Gautham
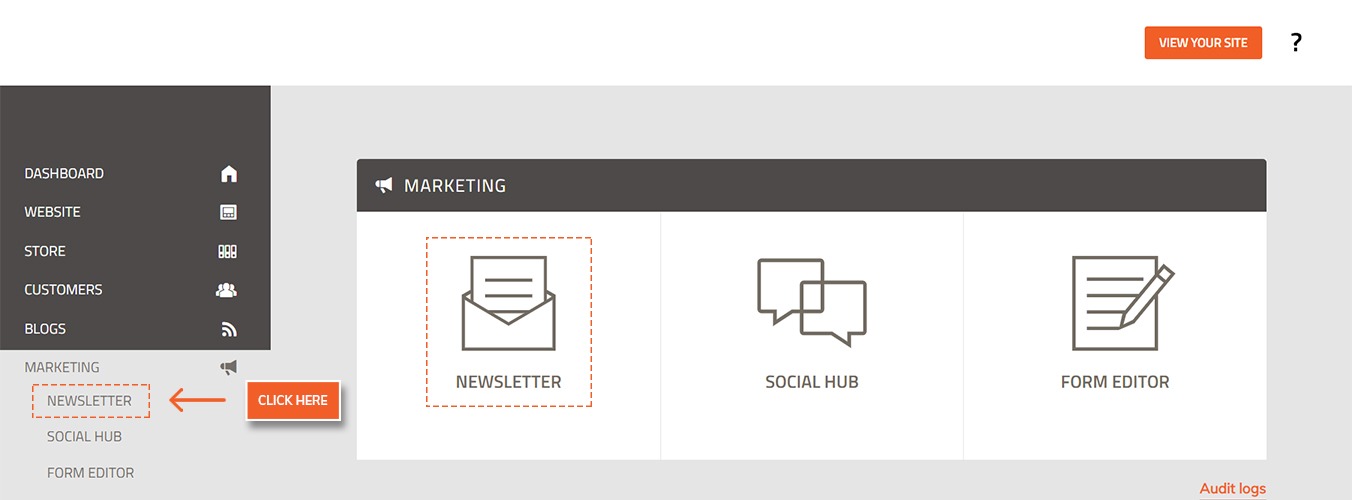
1. Go to the Workspace
2. Click on Marketing tab

3. Click on Newsletter tab
4. Setup Basic Color and From Scheme
Click on Colors/Fonts from the left menu below Newsletter.
You can set up the basic Newsletter font and color scheme here like Email Background color, Newsletter Background color, Text color, Link color, Link hover color, Button background color, Button Text color, Button hover background color, Button hover text color and Font Family.
Once you have setup everything Click on Save and Appy button on top right corner.

5. Create the Newsletter Campaign
Click on Newsletter from the left menu.
Click on Create New button on the top right corner.
.jpg)
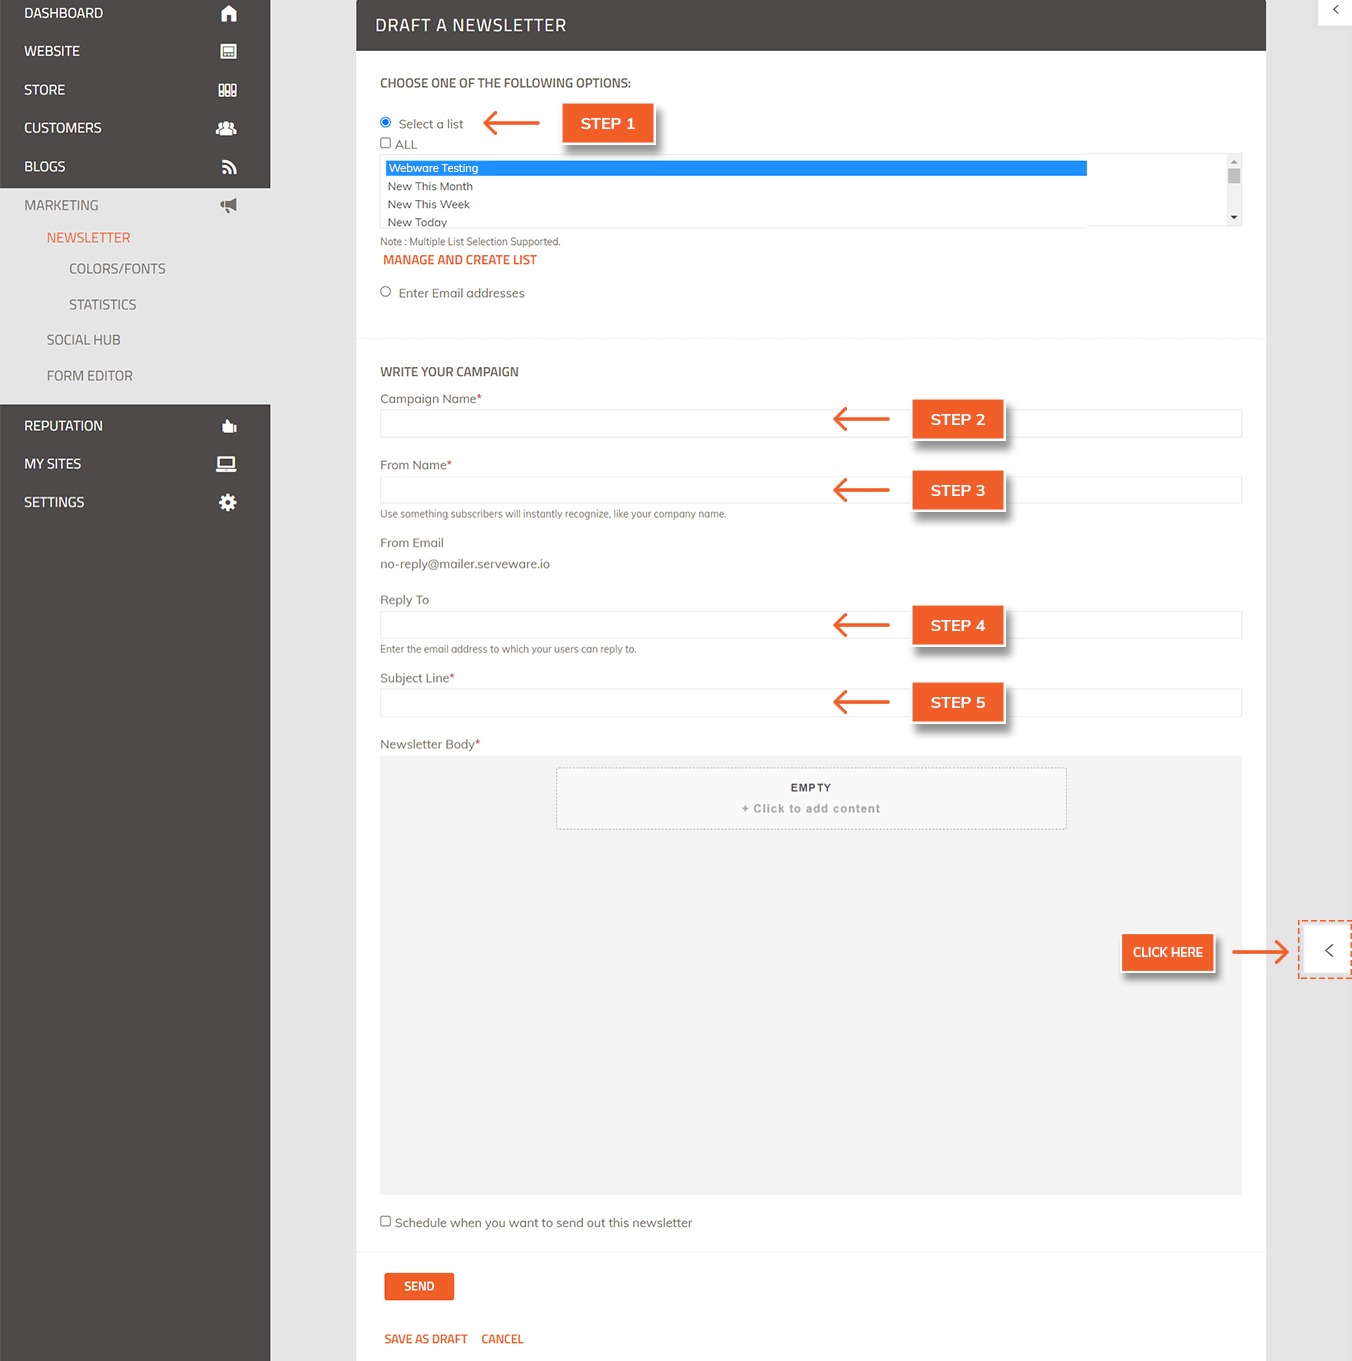
In Select a List, select your desired list, eg. Webware Testing.
Under Campaign Name enter the desired Campaign name, eg, Happy Holidays 2022
In From Name, enter Your/sender name, eg. (Business name)
In Reply To, enter Your/sender email address, eg. (Business email id)
The Subject Line can be identical to the Campaign name.
6. Start Building The Newsletter
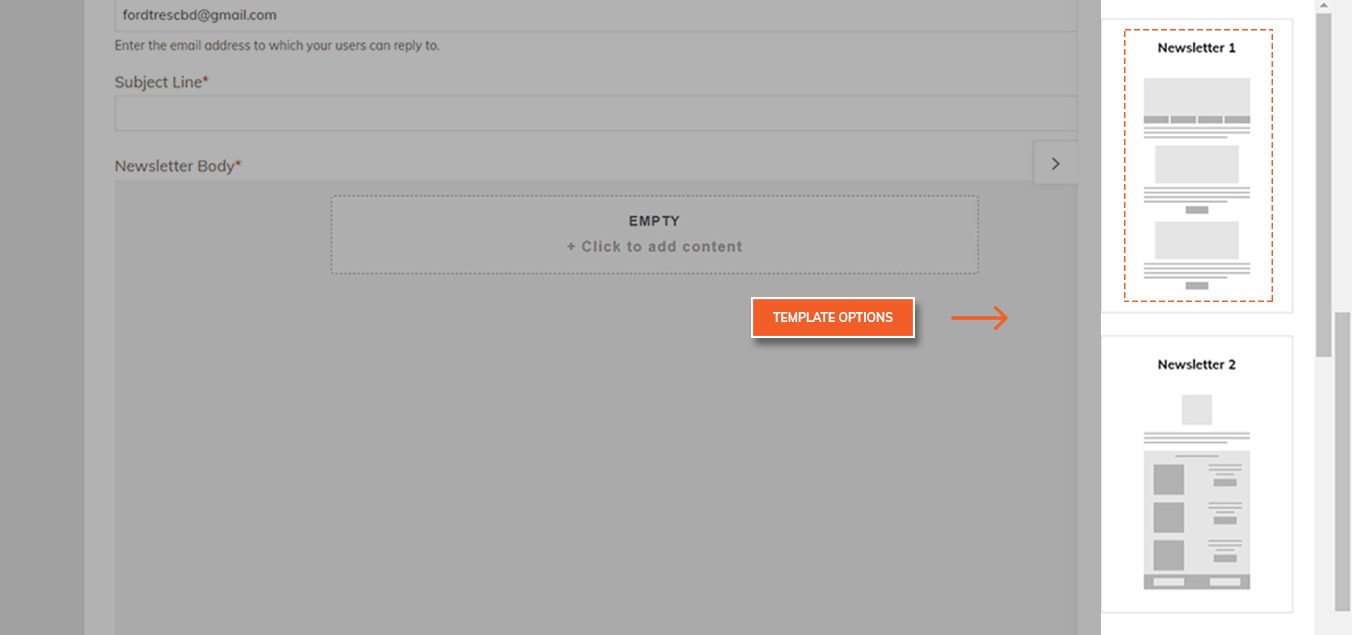
Click on the Arrow symbol on the right-hand side.
This will show you all the template options. On the top of the list by default, it will show the Built-in templates you can use.
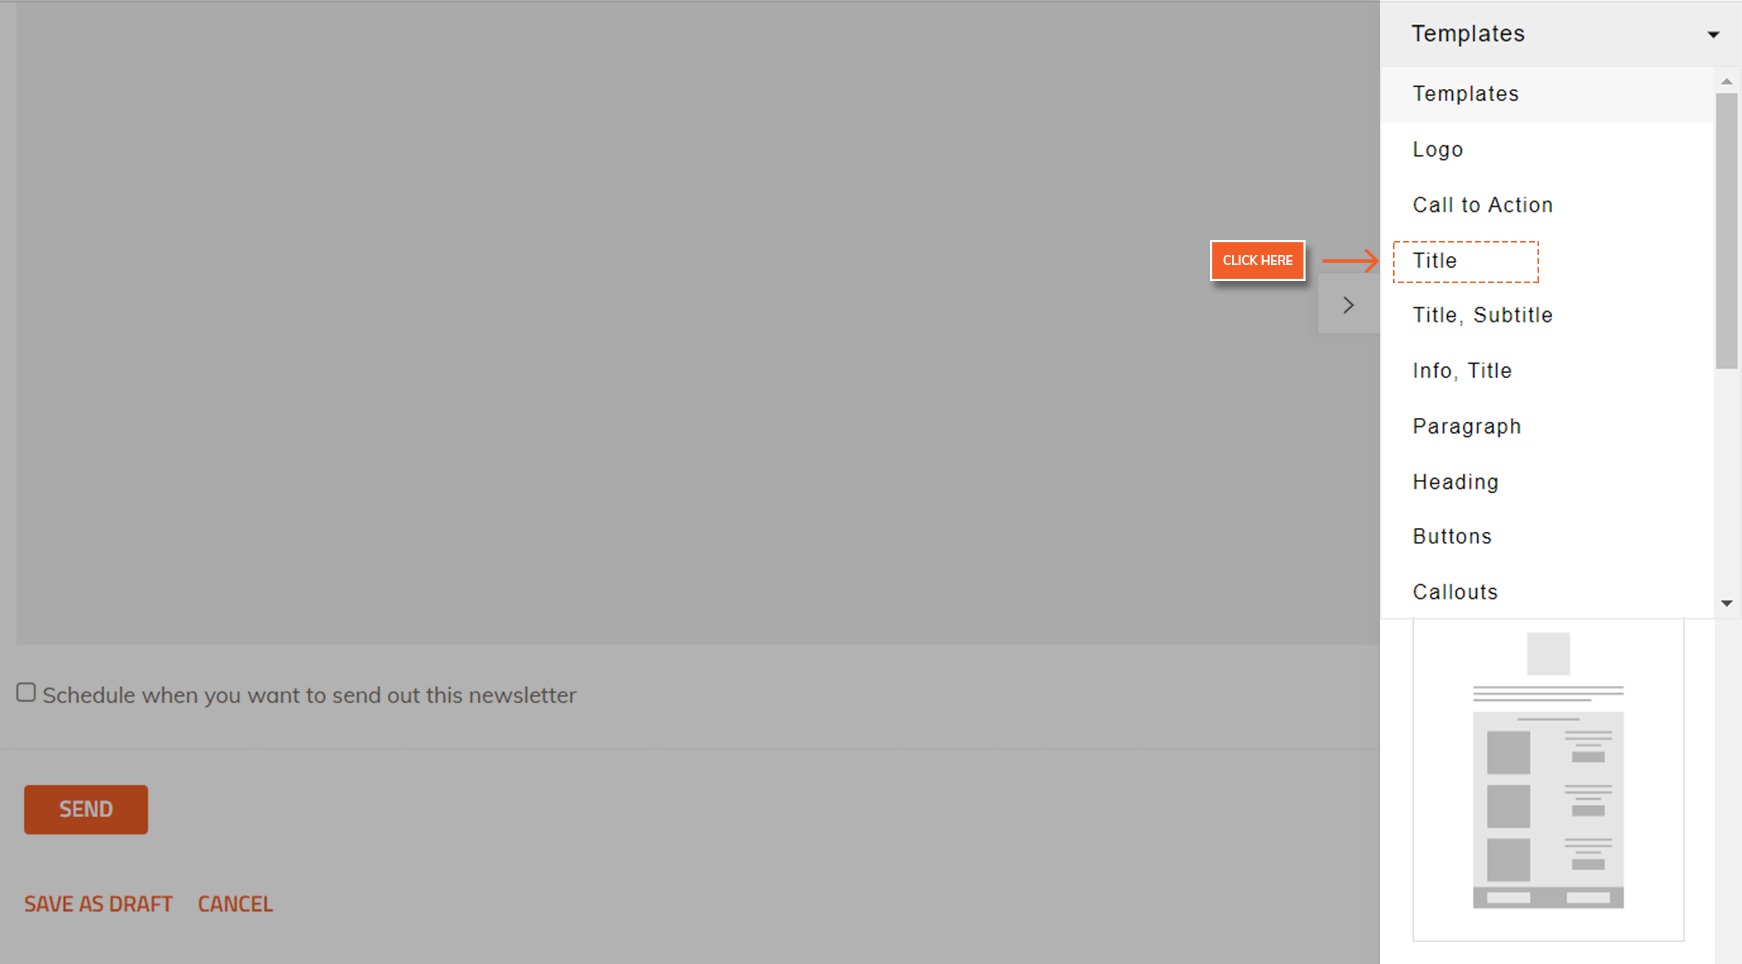
Click on the drop-down arrow on the left-hand side of the Template option.

Here you will get to choose various sections to drag and drop the newsletter snippets to create a design of your choice:-
Logo
Call To Action
Title
Title, Subtitle
Info, Title
Paragraph
Heading
Buttons
Callouts
Images + Caption
Images
List
Pricing
Quotes
Profile
Contact Info
Separator
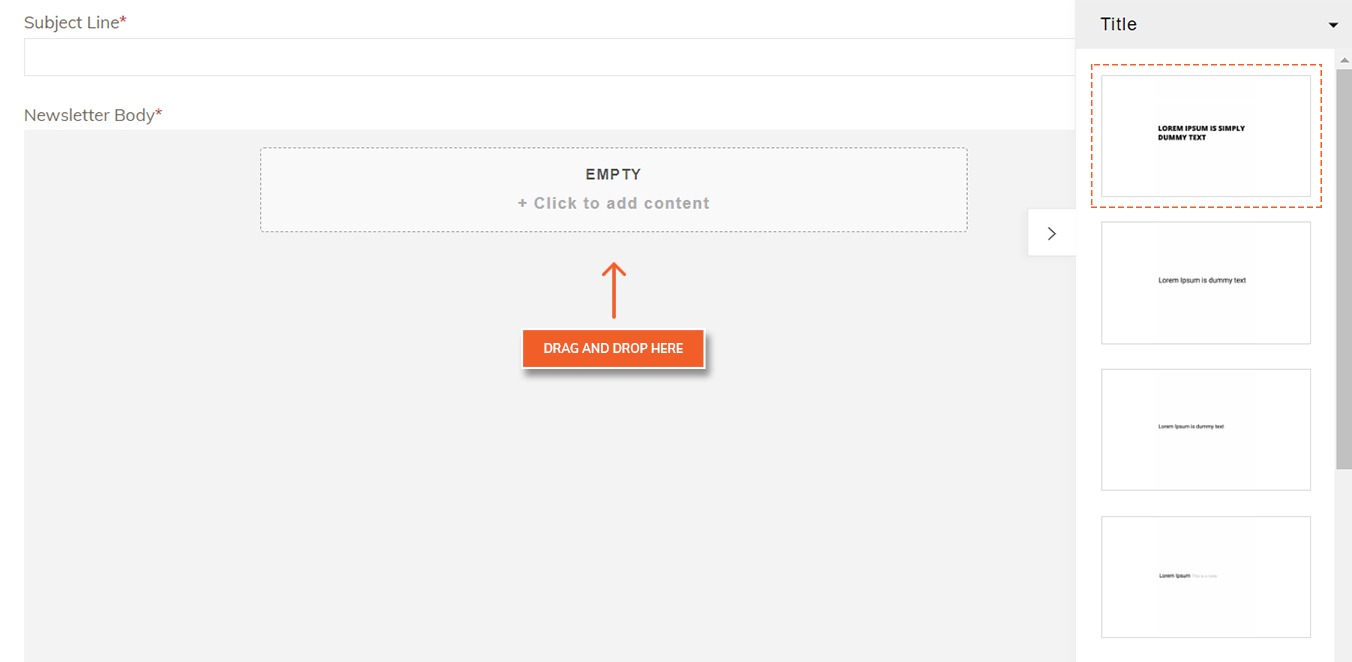
Click on the desired option from the dropdown menu, eg Title
To get started drag and drop your desired layout option from the dropdown menu onto the empty space in the center.
7. Editing The Newsletter
To edit any part of the template you need to click on the desired part of the template.

8.General Editing Options
These appear as a bar on top whenever you want to edit the template.
Bold (B): You can make the text bold using this option
Italics (I): You can make the text style italic.
Underline (U) : You can use this to underline the text.
Formatting (A): Used for text formatting. If you click on this you will get four options, Strikethrough, Superscript, Subscript and Uppercase and Clean
Color: You can change the text or background color depending on what part of the template you are currently working on.
Align: If you click on this you will get four options to select from i.e. Left Align, Right Align, Center Align and Full Align.
Text Setting: If you click on this, you will get an option to change the text size, line space and letter spacing.
Hyperlink: To link an image or text.
Unsubscribe:
More: If you click on this you will get eight options:
Word count (i): If you click on this it will show you the Word Count, Characters Count and Characters (no space) Count.
Symbols: If you click on this, you will a list of special symbols to choose from, eg, Arrow, Smileys etc
Image: You can click here to add an image.
List: If you click on this you will get four options to select from Bullet list, Numbering List, Indent List and Outdent List.
Font (a): If you click here you will get options to change the font of the text.
Paragraph (H): If you click on this you get six options to choose from. I.e. Heading 1, Heading 2, Heading 3, Heading 4, Paragraph and Preformatted.
HTML (<>): If you click on this you will get the HTML code for the entire template.
Preferences;

Undo: Used to undo any edits.
Redo: Used to redo any edits.

Click on the desired part of the template. You will get three options on the right-hand side.
Move: Use to drag and move the image template up and down the entire newsletter template.
More: If you click on it you will get options to move the template up or down, duplicate the selected template part and you can view and edit the HTML of the selected template part.
Delete: Delete that template part.
At the bottom right corner of the template you will get the option Settings. If you click on this will get the snippet of the HTML code to edit the template on the right-hand side.

9. Edit Background Color
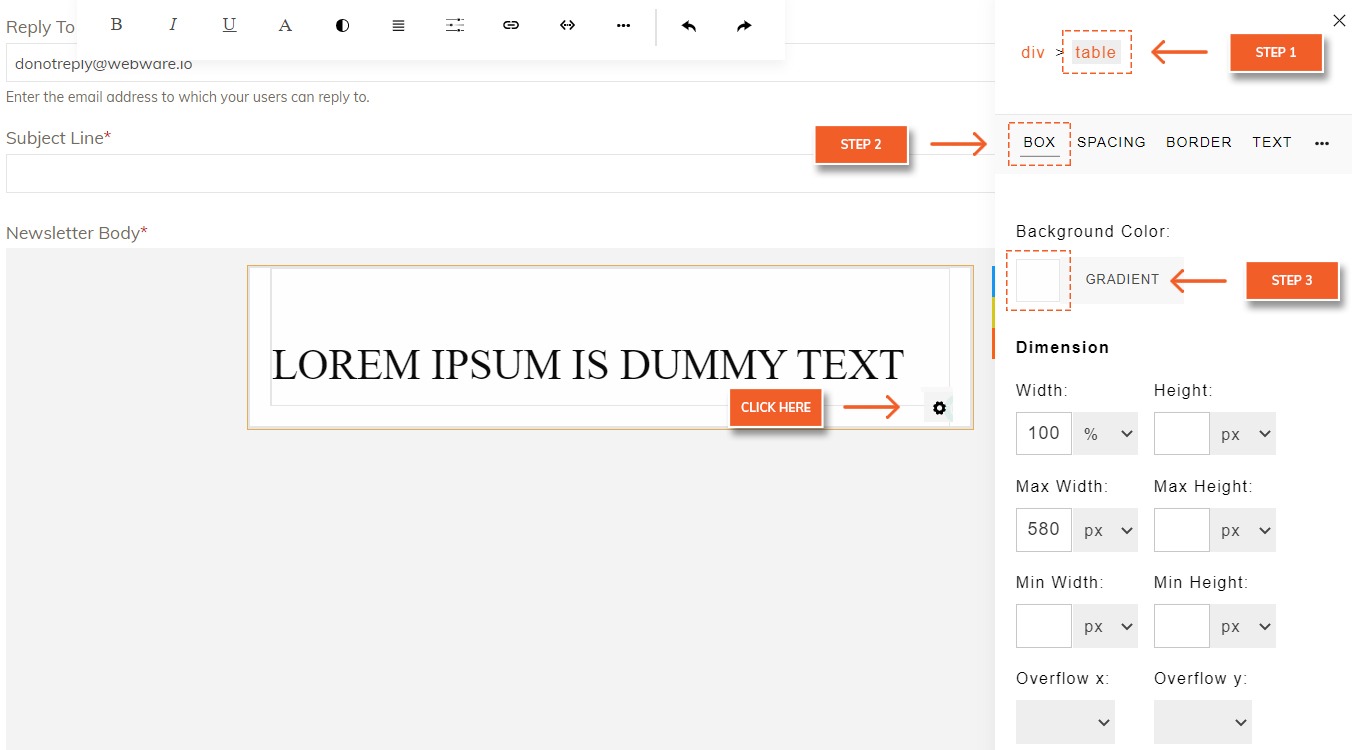
Click on the desired part of the template.
Click on the Setting icon at the bottom right corner.
A menu will appear on the right-hand side. Click on the table tag just after the div tag.
Below the HTML tags, there is a bar with options: Box, Spacing, Text and More. Click on Box.
Below that you will see the Background color and a white box, click on that.
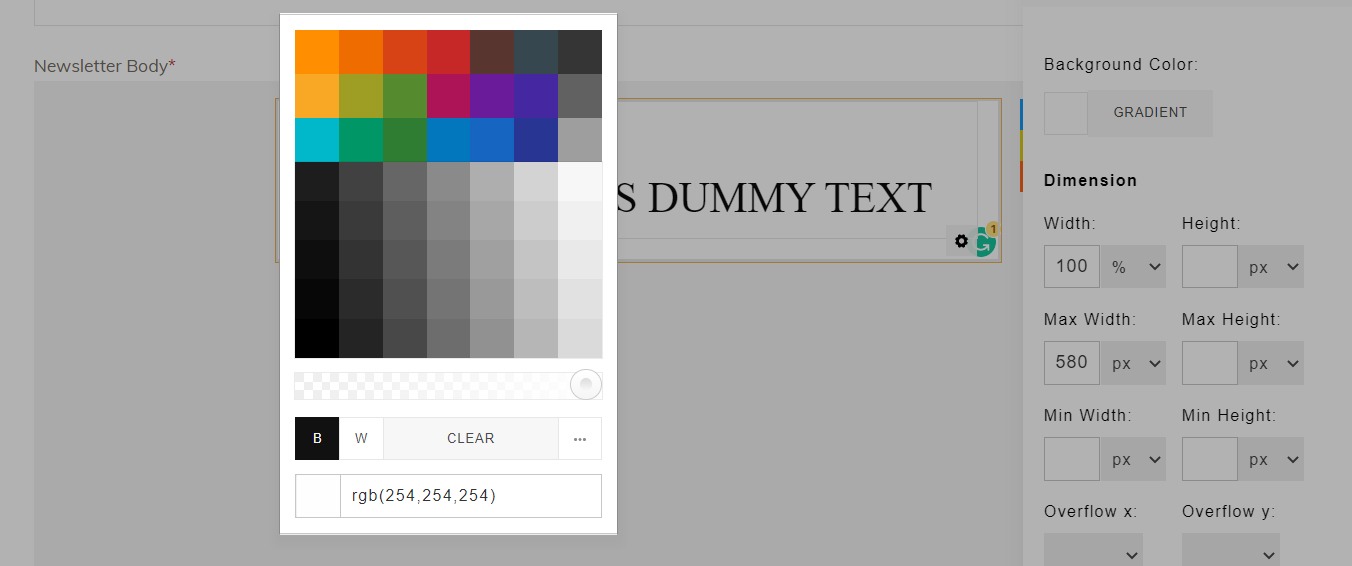
A pop-up with all the colors will appear. You can either select from the given colors or enter the RGB color code at the bottom text box besides the white box.
10. Adding Logo and Images
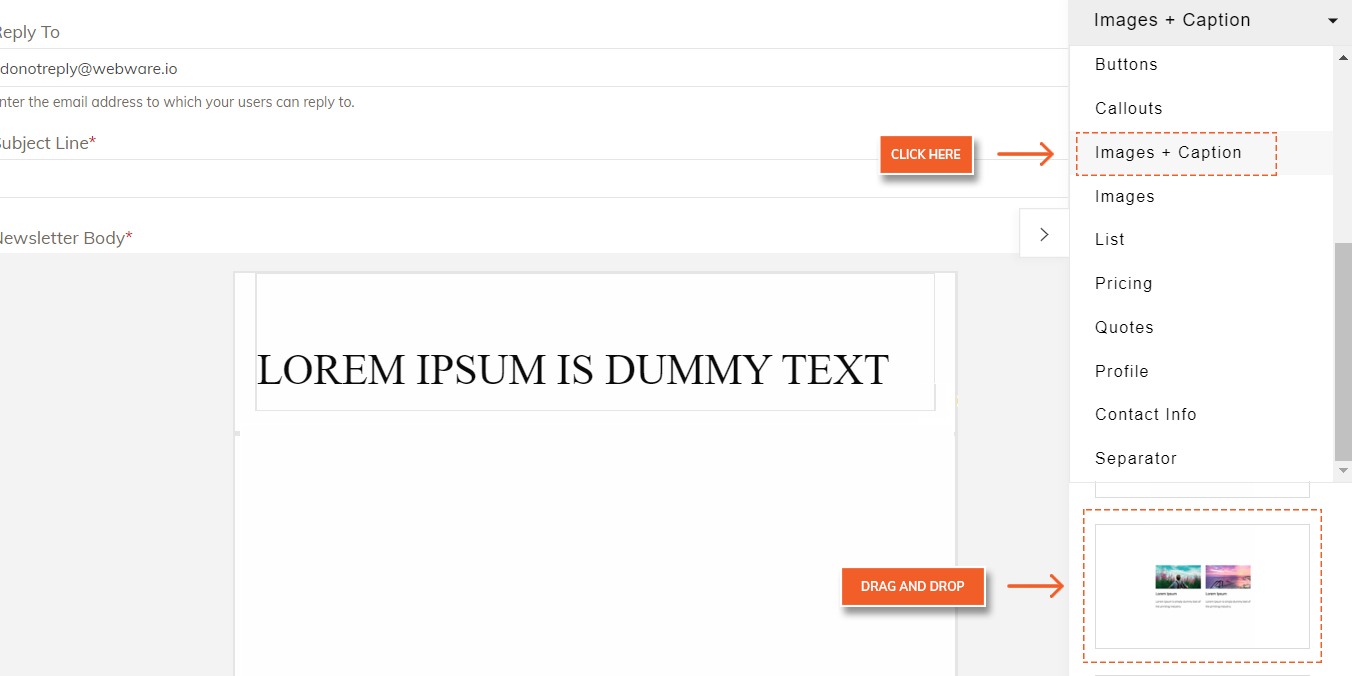
Drag and drop the desired Logo or Image template from the right-hand side drop-down menu.
Click on the image.
You will get two options Change Image and Link
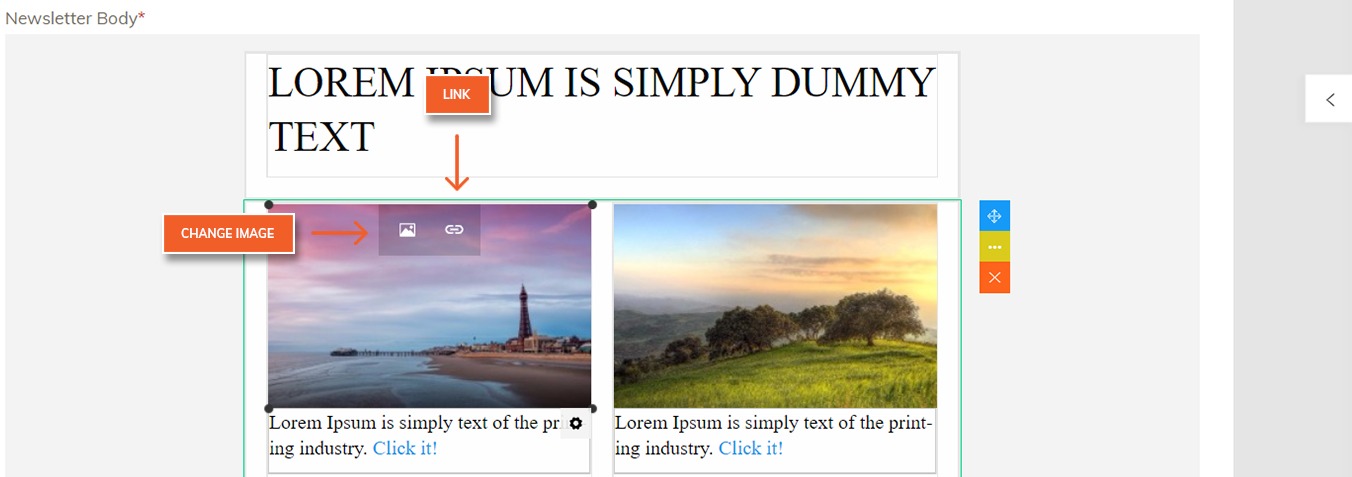
Click on Change image to upload a new image.
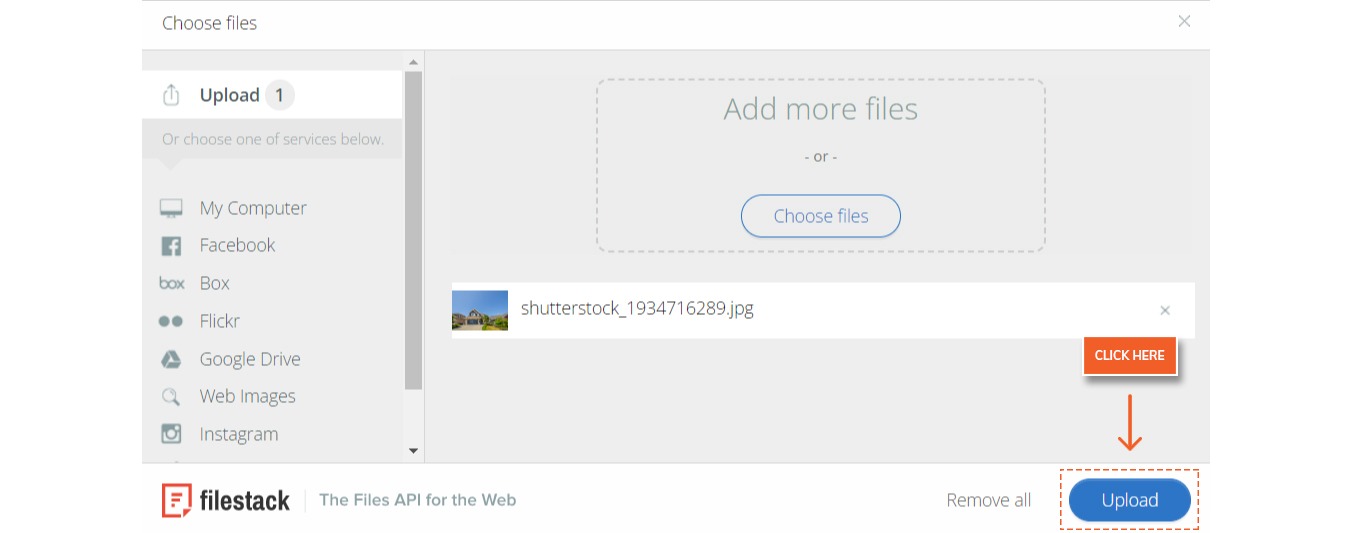
A pop-up will appear with an option to upload an image or use images previously uploaded.
To Upload a new image click on the Upload Image button on the right-hand side corner.
A new pop-up will come where you can drag and drop the desired image or you can click on Choose Files button and navigate to the folder where the image is present and select the image.

Once the image is uploaded, it will appear under the Uploaded Media folder on the left-hand side. You need to click on the drop down arrow and then select the uploaded image. All your previously uploaded images will appear under this folder.
Click on the link icon to add a link to the image.
A pop-up will appear with the Image URL, Image Title and Link. You need to enter the desired link that you want to add to the image in the Link Text box. Image Title is optional.
Click on Ok to save the edits.

11.Edit Title, Title - Subtitle, Info, Paragraph and Heading
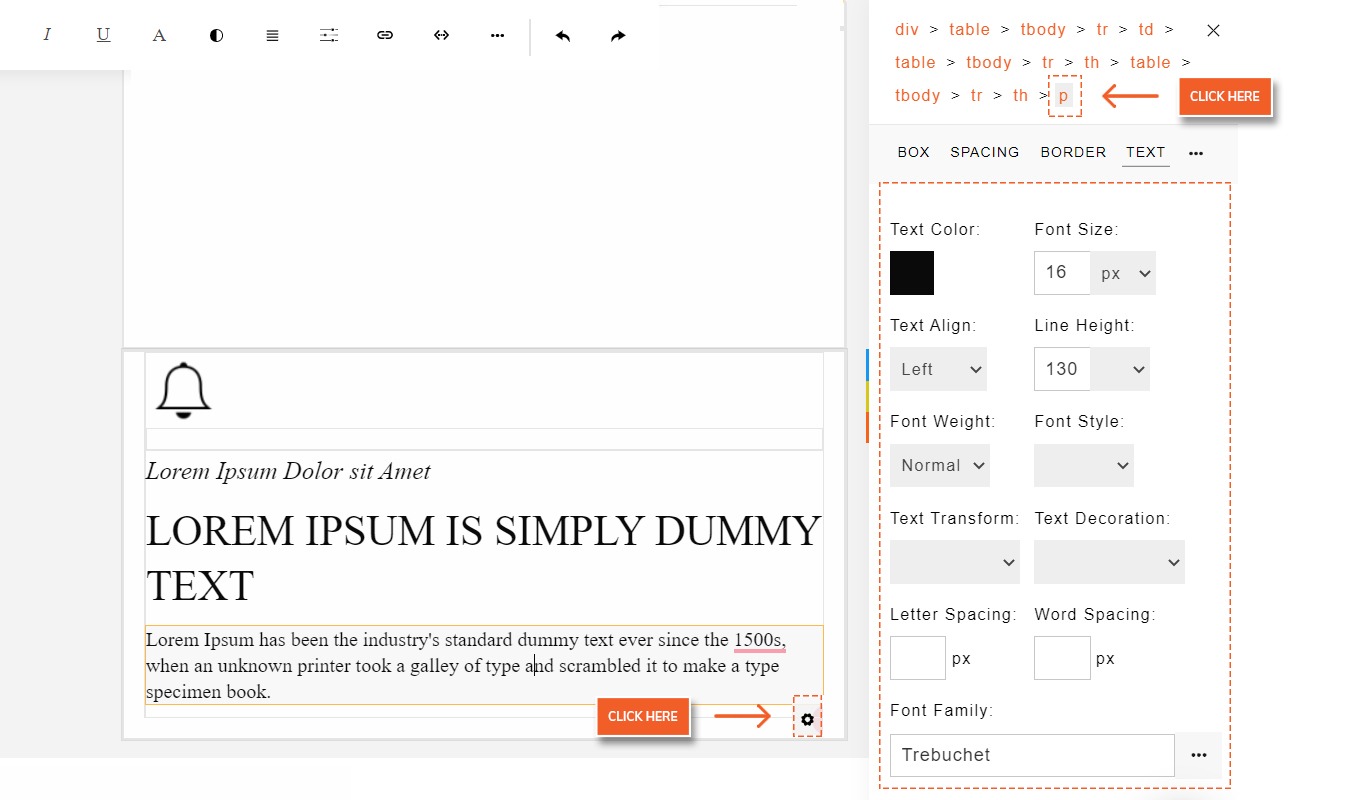
Click on the desired text.
Click on the Setting icon at the bottom right corner.
A menu will appear on the right-hand side. Click on the p tag or h1/h2/h3/h4 tag.
Below the HTML tags, there is a bar with options: Box, Spacing, Text and More. Click on Text.
Font Color: To change the text color click on the white box under Text Color.
A pop-up with all the colors will appear. You can either select from the given colors or enter the RGB color code at the bottom text box besides the white box.
Font Size: To change the Font size you can click in the text box below Front Size.
Text Align: You will get a drop-down menu below Text Align with options: Left Align, Right Align, Center Align and Full.
Font Weight: You can set the font-weight from the given options in the drop-down menu. Eg. Normal, Bold etc
Font Style: You can select Normal or Italic font style from the drop-down menu.
Text Transformation: You can select Uppercase, Lowercase, Capitalized or Normal from the drop-down menu.
Text Decoration: You can select Underline, Line through, Overline or None from the drop-down menu.
Font Family: You need to enter the desired text family in the text box under Font Family.
12. Edit Hyperlinked Text
To add a hyperlink to a text you need to select the desired text and then select the Hyperlink option from the top horizontal bar.
Enter the URL in the text box where you can see the URL in light grey color.
Click on the Setting icon at the bottom right corner.
A menu will appear on the right-hand side. Click on the a tag.
Below the HTML tags, there isa bar with options: Box, Spacing, Text and More. Click on Text.
Font Color: To change the text color click on the white box under Text Color.
A pop-up with all the colors will appear. You can either select from the given colors or enter the RGB color code at the bottom text box besides the white box.
Font Size: To change the Font size you can click in the text box below Front Size.
Text Align: You will get a drop-down menu below Text Align with options: Left Align, Right Align, Center Align and Full.
Font Weight: You can set the font-weight from the given options in the drop-down menu. Eg. Normal, Bold etc
Font Style: You can select Normal or Italic font style from the drop-down menu.
Text Transformation: You can select Uppercase, Lowercase, Capitalized or Normal from the drop-down menu.
Text Decoration: You can select Underline, Line through, Overline or None from the drop-down menu.
Font Family: You need to enter the desired text family in the text box under Font Family.
13. Edit Buttons
Click on the Button.
You will get four Options on top: Edit Button, Link, Duplicate and Delete.

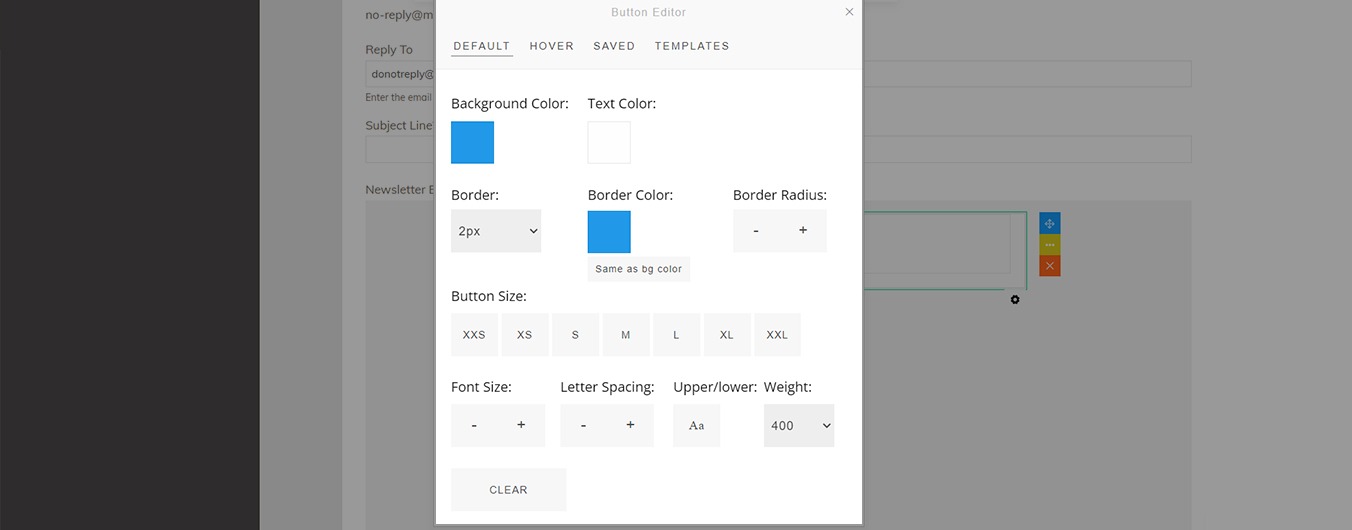
Click on Edit Button.
Background color: To change the button background color click on the color box. A pop-up with all the colors will appear. You can either select from the given colors or enter the RGB color code at the bottom text box besides the white box.
Text Color: To change the text color click on the color box. A pop-up with all the colors will appear. You can either select from the given colors or enter the RGB color code at the bottom text box besides the white box.
Border: Click on the drop-down menu below Border to select the size of the border.
Border Color: To change the button border color click on the color box. A pop-up with all the colors will appear. You can either select from the given colors or enter the RGB color code at the bottom text box besides the white box.
Click on Link to link the button.
A pop-up will appear. You need to enter the url in the text box where you can see the URL in light grey color.
Click on Duplicate to create a duplicate of the button.
Click on Delete to delete the button.
14. Test The Template
Once the template is ready, click on Save As Draft at the bottom left corner.
Once the template is saved. You can send a test draft to yourself by clicking Send As Draft, then enter your email id and click on send.
 Did this answer your question?
